Glassmorphism gains more and more popularity among the new UI trends in 2021. It catches an eye with vivid colors, blurred transparency, and a multi-layered approach to the floating objects.
Do you want to know how to design trendy UI pieces with Glassmorphism? It’s so easy with our free graphic software Lunacy. Don’t wait till the trend passes away. Hop on this train right now!
I’ll use gradients, background blur, automatic text generation, and avatar tool – to mention a few features. Let’s get to it!
Here is the video tutorial and you can find the step-by-step guide below.
1. Open Lunacy.

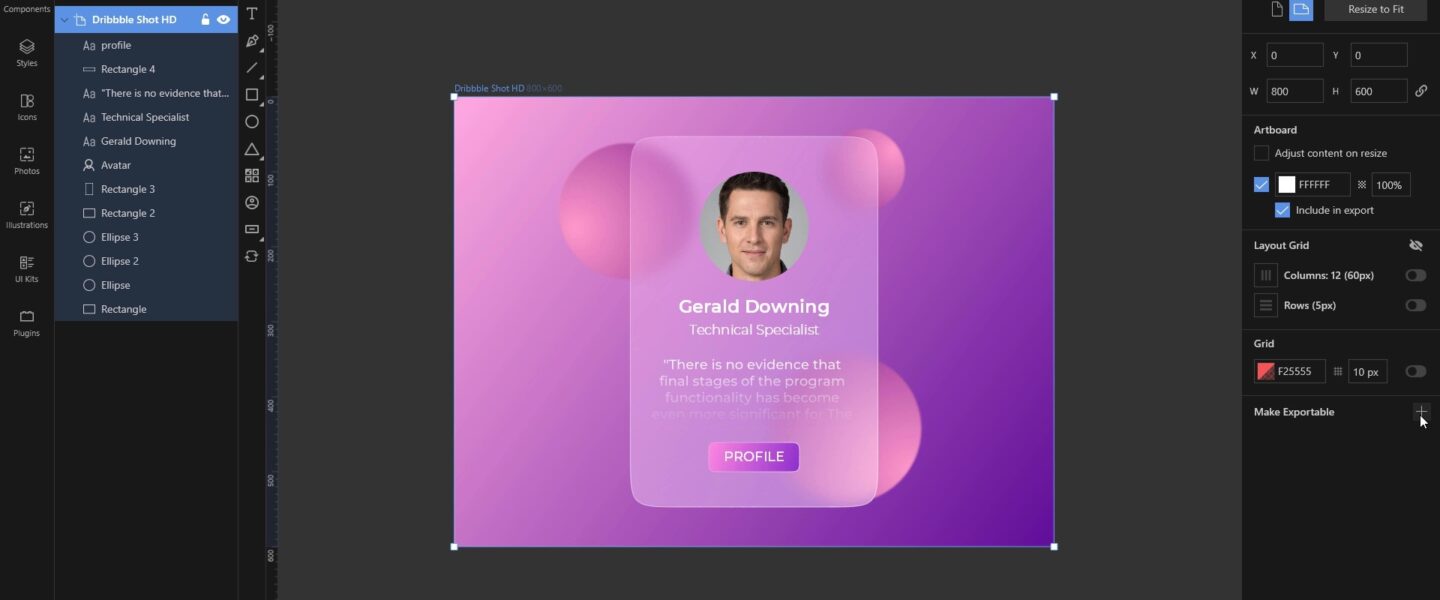
2. Choose the artboard you want. I’ve picked Social Media “Dribble Shot HD.”

3. Adjust the zoom to see the full artboard.

4. Select the Rectangle Tool and stretch the shape across the entire artboard.

5. Change the color of the rectangle. Choose the fill, for example, a linear gradient. I’ve chosen a double gradient with colors #FFA9DF and #5D0997.

6. Select the Ellipse Tool and add some circles of different sizes to the rectangle.

7. Select all the circles. Open the color settings to change the fill.

8. Change the fill of the circles to a radial gradient. Adjust the colors in it. I’ve picked #FF99CA and #710D87.

9. Set up the gradient look for each circle separately.

10. Select the Rectangle Tool again and stretch it over all the objects.

11. Reduce the Opacity of the rectangle to 5%.

12. Add a background blur. This feature blurs everything underneath the selected object.

13. Adjust the blur to make the circles’ edges less sharp and get a nice effect imitating a bokeh background. I’ve reduced it to 1.

14. Add a new small rectangle on top of the other objects in the middle of the artboard.

15. Adjust the corner radius. I’ve set it to 30 and added a smooth corner.

16. Choose a linear gradient as the fill of the rectangle. Adjust the colors and opacity of it. I’ve chosen the colors #FFFFFF 20% and #FFFFFF 40%.

17. Add a border.

18. One of the special features of Glassmorphism is a semi-transparent border that simulates translucent objects’ glass edges. To create this effect, fill the border with a linear gradient. Adjust the colors and opacity of the gradient. I’ve chosen the colors #FFFFFF 20% and #FFFFFF 40%.
19. Add a background blur.
20. Adjust the blur. I’ve reduced it to 15 and added saturation 5%.

21. Select the avatar tool and add it to a semi-transparent rectangle.

22. Generate an avatar using the settings and the button in the right panel.

23. Select the Text tool and add a caption under the avatar.

24. Adjust the font, weight, size, and color of the text block.

25. Select text generation in the top bar and generate a random name. I’ve chosen the item “Full Name.”

26. Select the Text tool and add another text block under the first one.

27. Adjust the weight and size of the text block.

28. Select text generation in the top bar and generate a random job. I’ve chosen the item “Job Title.”

29. Select the Text tool and add a text block under the previous ones.

30. Adjust the weight and alignment of the text block.

31. Add a fill to the text block.

32. Choose a linear gradient as the fill of the text block. Adjust the colors and opacity of the gradient. I’ve chosen the colors #FFFFFF 100% and #D3D3D3 5%.

33. Enlarge the text block.

34. Select the Rectangle tool and add a button shape to the bottom of the semi-transparent rectangle.

35. Adjust the corner radius. I’ve set it to 8 to make a smooth corner.

36. Choose a linear gradient to fill the button and adjust the colors. I’ve chosen the colors #FF87E0 and #8C2ECD.

37. Add a border.

38. Choose a linear gradient instead of the color of the border. Adjust the colors and opacity. I’ve chosen the colors #FFFFFF 20% and #FFFFFF 60%.

39. Select the Text tool and add a text block to the button.

40. Type in a caption and adjust the text block. I’ve added an Upper Case.

41. Align all the elements except circles to the center of the composition.

42. Select all the objects by pressing Ctrl (Cmd) + A on your keyboard or by clicking the artboard title in the left top corner of it.

43. Сlick the plus button next to Make Exportable in the right tab.

44. Choose the right format from the drop-down menu. In this case, I will keep JPEG.

45. Click the Export Selected button to save your image.


Result
That’s it! With these simple steps, you can create fun and trendy UI designs using Glassmorphism. This could be just what your portfolio needs to shine in 2021.
Explore other Lunacy tutorials to unleash your creativity and learn something new right now:
- Create a Facebook banner.
- Make your own images using built-in photo and illustration libraries.
- Cutout raster images and paste them into Valentine’s day cards.
- Create a meme in just a few minutes.
About the author: Julia G, a wonderful creature responsible for QA and SMM at the Lunacy team.