
Social media is a great place for designers and illustrators to share their work. But it’s also a breeding ground for art theft. So how do you stop it? How do you protect your work when you post it online?
One way is to watermark your stuff. While it’s not 100% effective, it does help to establish ownership.
But, here’s the truth: I don’t watermark my designs. Why? Because, like a locked car, if a thief wants it badly enough, they’ll just “break in” and steal it. In this case, they’ll just remove the watermark. So is it worth it? Well, maybe…
Lately, I keep seeing more posts and discussions from other artists and designers who’ve had their work stolen. In fact, I recently had a conversation with Brian Allen at Flyland Designs after reading a Facebook post he made about his work being stolen.
Here’s what he had to say:
“I’m lucky enough to have a lot of my illustrations shared on social media and picked up in Google image searches. That kind of exposure is really helpful in the way new clients find me. Unfortunately, that means that my work is easier to steal. I typically find out about another company or even an another artist stealing my artwork every couple weeks. Artist friends, clients, and potential clients usually recognize my work and alert me – who knows how many I’m not aware of.”
So I asked him if he used watermarks. And, sure enough, he does:
“I place a watermark with my name, website, and copyright info on all my images. I’m not brave enough to put it over the whole image (I hate the way it looks), so instead, I overlap the image a little in the bottom corners. This is usually effective, but not always. Most of these guys can airbrush out a logo, even if it’s over the whole image. If they want it bad enough, they’ll find a way.
But the watermark serves the purpose of alerting people that this belongs to someone. Remember that a lot of “art thieves” are truly unwitting. They believe that if they found it on Google, it’s fair game (which we all know is false, of course, but it’s not common knowledge). So adding the watermark is very important for that reason alone, because I get calls from t-shirt shops all the time because their clients tried to print my design thinking they could.”
What he said got me thinking: maybe it’s time I start “locking my doors”. Like my mother says, “Locking your doors only keeps the honest people, honest.” And in this game, that might be a good place to start.
Creating and using watermarks in Photoshop
There are a number of ways in which you can create a watermark in Photoshop (you can use watermark software too). I’ll show you three different ways, and then you can decide what works best for you.
How to create a watermark with the Text Tool
One of the quickest and most versatile ways of making a watermark in Photoshop is by using the Text Tool. With the text tool, you’re able to make changes on the fly and apply different styles depending on what you’re looking to accomplish. You’re also able to resize the text to suit your needs.

To create watermarks using the Text Tool, do the following:
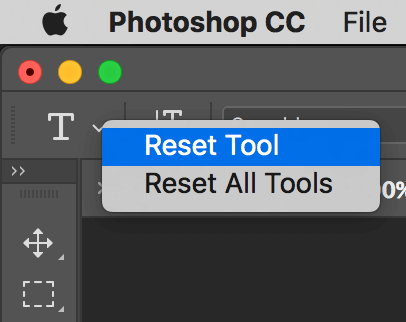
- In Photoshop, with your design open, switch to the Text Tool. Then, right-click the icon in the top-left corner, and select Reset Tool.
- Next, set the options for your text. This includes Font Style, Size, and Color. I went with Oswald Regular, 200px, and Black.
- Now, enter the text you want for your watermark and center it on your image.

If you’re on a Mac, you can use “Option-G” to make a copyright symbol: ©
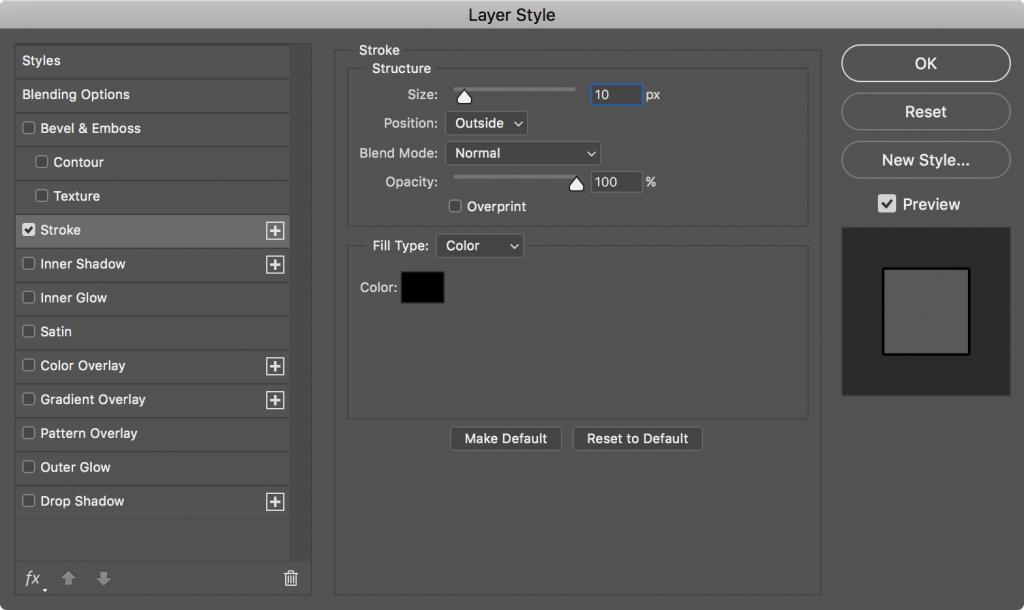
- With the text layer selected, it’s time to add an effect. You can select any effect you’d like, but I’m going to select Stroke… because I like how it looks.

- For the Stroke settings in the Layer Style panel, set the Color to Black, the Size to 10px, and the Opacity to 100%. Then click OK to apply.
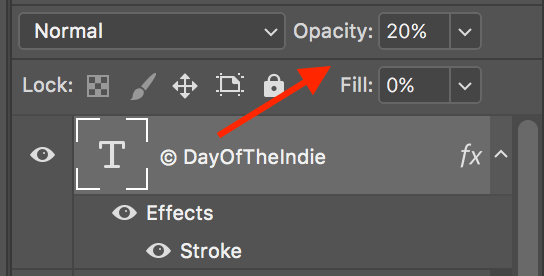
At this point, your watermark is going to look a little strange. That’s OK. You’ll fix it in the next step.

- With the text layer still selected, set the Layer Opacity to 20% and the Fill to 0%.
- Once you have the text added and the layer settings set, you can resize the text and place it anywhere you want.

How to create a watermark with a Custom Brush
Another way to add a watermark is to create a custom brush and use that. I won’t go into the details of how to create a custom brush in Photoshop.

Once you have your custom brush created, you can add it as a new layer in your design. Remember to set the Layer Opacity and brush size. The placement is up to you!

There are many benefits to using a custom brush. The biggest one is that you can use an image as your watermark.
How to create a watermark with a Custom Pattern
Finally, you can use a custom pattern as your watermark.
The process of creating a custom pattern is similar to creating a custom brush. The only difference is instead of saving the image using Define Brush Preset…, you’ll use Define Pattern….
With the pattern created and saved, you can now apply it to your design. This process is a bit more involved than just using a brush:
- First, create a new empty layer within the design you wish to watermark.
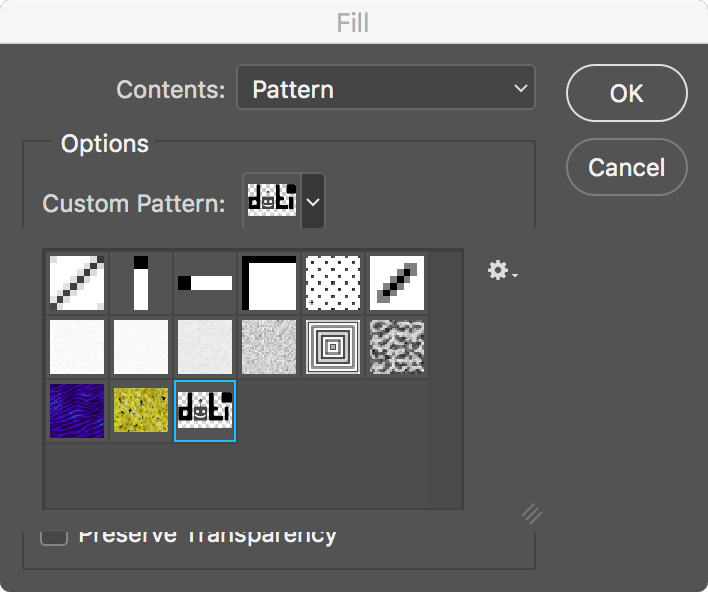
- Then, from the main menu, select Edit > Fill.
- In the Fill dialog box, switch the Contents to Pattern and select the Custom Pattern of your choice. When you’re done, click OK to apply the fill pattern.
Your watermark looks a little odd right now, but you’ll fix that next!

- With the new layer selected, set the Layer Opacity to 15%. Then, transform the layer by resizing and rotating it until you like what you see.

And there you have it! Three different ways to make a watermark in Photoshop.
Of course, you can also combine all three of these methods to make one watermark to rule them all.

About the Author
Tammy Coron is an independent creative professional and the host of Roundabout: Creative Chaos. She’s also the co-founder of Day Of The Indie, the organizer behind Indie DevStock, and the founder of Just Write Code. Find out more at TammyCoron.com.
Learn how remove background from picture in Photoshop, and how to use Background Eraser Tool in Photoshop.