If you mostly deal with static design, but there’s a sudden task to cut out some parts in the video, check out this simple guide for beginners.
According to a report by Nielsen-Norman Group, we have only 10 seconds to capture someone’s attention with our content or message. Therefore, removing unnecessary parts from your video will help to get the audience engaged from the very first shot.
And that’s where a cut tool can come in handy. A cut tool helps to delete unrelated parts of your clips, even if they are right in the middle of a clip. In this article, you will find detailed information on how to use cutting and trimming tools to edit your clips, improve your content with these tools, and capture viewers’ attention from the first second.
Cutting vs trimming
First, let’s find out the difference between trimming and cutting. Indeed, they both are used to remove unnecessary parts of your footage, but there is a difference.
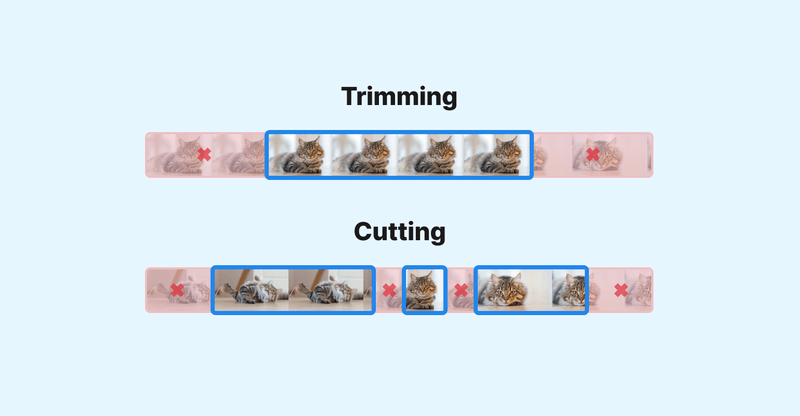
Trimming means removing the top or tail portions of a video clip. For example, to cut out a long and boring intro, or unwanted last seconds of a video. On the other hand, cutting means splitting a clip into sections by making cuts to rearrange these sections or delete unrelated parts.
So, in simple words, trimming is used to edit the beginning and end of a clip, while cutting is used to cut out and remove portions of a clip.

Cutting Tools: What to Choose?
It is not always necessary to install a video editor. Basically, there are three ways:
- Cut tool built into the video editor. All video editing software usually has a built-in cutting tool.
- Online video cutter. For example, you can try an online video cutter by Movavi or Kapwing. They are simple, free, and provide a step-by-step guide on how to cut a video.
- Built-in apps on Mac and Windows. For example, Windows 11 comes with Clipchamp, while Windows 10 users can find a built-in video editor in the Photos app. For Mac users, the built-in video editing app is iMovie.
If you’re a beginner or just need to use a cutting tool for once, an online cutter is perfect for you. But, if you work on a more complex video and need to cut and trim clips frequently, a built-in cut tool will be more comfortable to work with.
How to Cut a Video on PC: 3 Simple Steps
Let’s learn how to do it in 3 steps using Clipchamp.
Add Your Clips to the Timeline
Drag and drop one file or a batch on the timeline and arrange them to understand what parts you want to cut.

Select a section you want to cut
Move a playhead to the point where you want to make the first cut. Click on the scissors icon or use a keyboard shortcut to make a cut (usually it is the S or C key). Then move to the next point and make the second cut.


Remove an Unwanted Section
Click on the section you cut out and then click on the trash icon. Preview the clip to make sure you remove all unwanted parts.

How to Cut a Video on Mac
Here is a quick guide on how you can remove unwanted parts of your video with Movavi. We will be using its online version, but the workflow with a native app will be pretty much the same:
Upload a video you want to cut
Just drag and drop a video, or click Add Your Files to choose a video from your computer.

Choose a section to cut
Place the playhead where you want to make a cut and then click the scissors icon.


Remove the section
Choose a section you want to cut out and click on the trash icon. Then export the video or click “Continue with other tools” if you want to use other tools by Movavi to edit your video.

Read more: Create animated explainer videos for marketing: 4 dos and don’ts
About the author
Alex is a content developer both by passion and profession. His favorite niche, as well as expertise area, is digital marketing. Alex is very ardent about certain interest areas like SEO, digital strategies, video editing, and link building.